Recent Posts

Showing posts with label Blogger Widget. Show all posts

Add Social Sharing/Bookmarking Widget with Cool Hover Effect

0

Add Social Sharing/Bookmarking Widget with Cool Hover Effect

How to Install Social Sharing/Bookmarking Widget?

Step 1: Adding Css code
  1. Login to Blogger Dashboard > Design tab > Edit Html
  2. Click on Expand Template widgets ckeckbox
  3. Search for ]]></b:skin> tag and put below code above it!
    #w2b-share ul {list-style: none;clear: none;padding: 0px 0px ;margin: 5px 0;}
    #w2b-share ul li {display: inline;background:none;margin:0;padding:0;}
    #w2b-share ul li a {display: block;float: left;width: 32px;height:32px;background-image: url('https://blogger.googleusercontent.com/img/b/R29vZ2xl/AVvXsEjUE93Xvem8Jr6mbhr8ccFCGQJHJg5855L3ev99DCv_Xh-E7ekdqqksFKRGxgBNuOji-1QyLNoVpEFJzmmCo9YtfMCDZeJgg91hs6GQSMq8nKHG3XbUav_hqaV-7vfvYUVMtdZ84XUEMLdF/s1600/way2blogging-share-icons-sprite.png') ;margin-left:3px;background-repeat: no-repeat;margin-right: 2px;-moz-transition: all 0.3s ease;-o-transition: all 0.3s ease; -webkit-transition: all 0.3s ease; -ms-transition: all 0.3s ease; transition: all 0.3s ease; }
    #w2b-share ul li a.twitter    {background-position: -0px -0px;   }
    #w2b-share ul li a.twitter:hover {background-position: -0px -33px;  }
    #w2b-share ul li a.facebook   {background-position: -32px -0px;  }
    #w2b-share ul li a.facebook:hover {background-position: -32px -33px; }
    #w2b-share ul li a.stumbleupon  {background-position: -64px -0px;  }
    #w2b-share ul li a.stumbleupon:hover{background-position: -64px -33px; }
    #w2b-share ul li a.digg    {background-position: -192px -0px; }
    #w2b-share ul li a.digg:hover  {background-position: -192px -33px;}
    #w2b-share ul li a.reddit   {background-position: -160px -0px; }
    #w2b-share ul li a.reddit:hover  {background-position: -160px -33px;}
    #w2b-share ul li a.google   {background-position: -128px -0px; }
    #w2b-share ul li a.google:hover  {background-position: -128px -33px;}
    #w2b-share ul li a.del-icio-us  {background-position: -480px -0px; }
    #w2b-share ul li a.del-icio-us:hover{background-position: -480px -33px;}
    #w2b-share ul li a.mixx    {background-position: -96px -0px;  }
    #w2b-share ul li a.mixx:hover  {background-position: -96px -33px; }
    #w2b-share ul li a.technorati  {background-position: -416px -0px; }
    #w2b-share ul li a.technorati:hover {background-position: -416px -33px;}
    #w2b-share ul li a.linkin   {background-position: -256px -0px; }
    #w2b-share ul li a.linkin:hover  {background-position: -256px -33px;}
    #w2b-share ul li a.yahoobuzz  {background-position: -448px -0px; }
    #w2b-share ul li a.yahoobuzz:hover {background-position: -448px -33px;}
    #w2b-share ul li a.myspace   {background-position: -512px -0px; }
    #w2b-share ul li a.myspace:hover {background-position: -512px -33px;}
    #w2b-share ul li a.more    {background-position: -576px -0px; }
    #w2b-share ul li a.more:hover  {background-position: -576px -33px;} 


Step 2: Adding Widget Code
  1. Search for <data:post.body/> tag
  2. And Put Below Code immediately after it! & Save your Template
    <b:if cond='data:blog.pageType == &quot;item&quot;'>
    <div id='w2b-share'>
    <ul>
    <li><a class='twitter' expr:href='&quot;http://twitter.com/?status=&quot; + data:post.title + &quot; - &quot; + data:post.url ' rel='nofollow' target='_blank' title='Share this post on twitter'/></li>
    <li><a class='facebook' expr:href='&quot;http://www.facebook.com/sharer.php?u=&quot; + data:post.url + &quot;&amp;title=&quot; + data:post.title' rel='nofollow' target='_blank' title='Share this post on Facebook'/></li>
    <li><a class='stumbleupon' expr:href='&quot; http://www.stumbleupon.com/submit?url=&quot; + data:post.url + &quot;&amp;title=&quot; + data:post.title' rel='nofollow' target='_blank' title='Share this post on Stunbleupon'/></li>
    <li><a class='digg' expr:href='&quot;http://digg.com/submit?url=&quot; + data:post.url + &quot;&amp;title=&quot; + data:post.title' rel='nofollow' target='_blank' title='Share this post on Digg'/></li>
    <li><a class='reddit' expr:href='&quot; http://www.reddit.com/submit?url=&quot; + data:post.url + &quot;&amp;title=&quot; + data:post.title' rel='nofollow' target='_blank' title='Share this post on Reddit'/></li>
    <li><a class='google' expr:href='&quot;http://www.google.com/bookmarks/mark?op=add&amp;bkmk=&quot; + data:post.url + &quot;&amp;title=&quot; + data:post.title' rel='nofollow' target='_blank' title='Bookmark this post on Google'/></li>
    <li><a class='del-icio-us' expr:href='&quot;http://del.icio.us/post?url=&quot; + data:post.url + &quot;&amp;title=&quot; + data:post.title' rel='nofollow' target='_blank' title='Share this post on delicious'/></li>
    <li><a class='mixx' expr:href='&quot;http://www.mixx.com/submit?page_url=&quot; + data:post.url + &quot;&amp;title=&quot; + data:post.title ' rel='nofollow' target='_blank' title='Share this post on Mixx'/></li>
    <li><a class='technorati' expr:href='&quot; http://technorati.com/faves?add=&quot; + data:post.url + &quot;&amp;title=&quot; + data:post.title' rel='nofollow' target='_blank' title='Fav on Technorati'/></li>
    <li><a class='yahoobuzz' expr:href='&quot;http://buzz.yahoo.com/submit/?url=&quot;+ data:post.url' rel='nofollow' target='_blank' title='Share this post on Yahoo!Buzz'/></li>
    <li><a class='myspace' expr:href='&quot;http://www.myspace.com/Modules/PostTo/Pages/?u=&quot;+ data:post.url + &quot;&amp;t=&quot; + data:post.title' rel='nofollow' target='_blank' title='Sahre this post on Myspace'/></li>
    <li><a class='a2a_dd more' expr:href='&quot;http://www.addtoany.com/share_save?url=&quot; + data:post.url + &quot;&amp;title=&quot; + data:post.title '/><script src='http://static.addtoany.com/menu/page.js' type='text/javascript'/></li>
    </ul>
    </div>
    </b:if>


Solution For Finding Code In Step 2

here i received a comment While finding the <data:post.body/> code is coming three time
This Problem comes when we install Auto Read Hack in our Blogs
For this Problem Search for any one line from below and Put Above Section of Wdget Code after it!
<div class='post-footer-line post-footer-line-1'>
<div class='post-footer'>
<b:if cond='data:blog.pageType == &quot;item&quot;'>
<data:post.body/>
Thank you for All your Info & Support

Add Fresh and Beautiful Search Boxes to Blogger / Blogspot

0

Add Fresh and Beautiful Search Boxes to Blogger / Blogspot


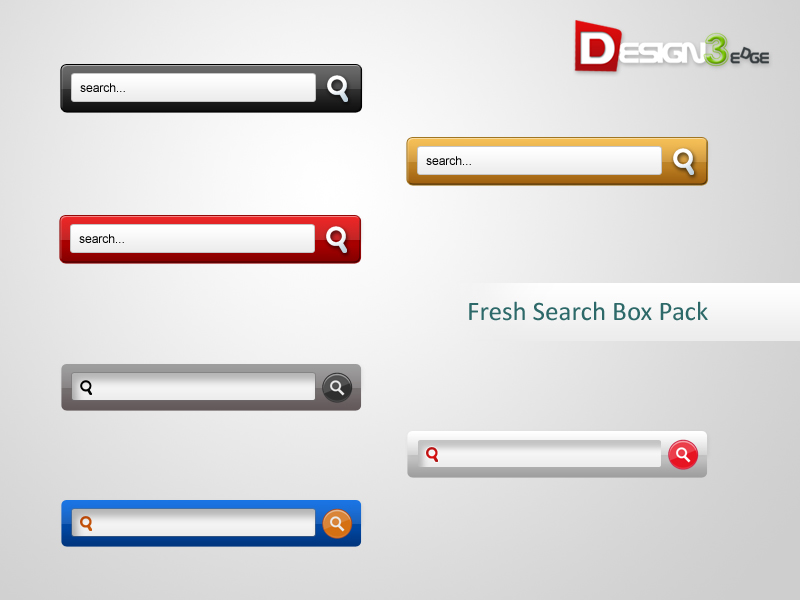
Add Fresh and Beautiful Search Boxes to Blogger / Blogspot Fresh and Beautiful Search boxes to your blogger blogs. i given a simple search box widget. here i giving six beautiful and fresh search box to you. Actually these are PSD source designed by Design3edge. i am converted to Blogger for you. hope you enjoyed with this!.

See the Screenshot of PSD source:-

How to Add Beautiful Search Boxes to Blogger

  1. Login to Blogger Dashboard -> Design tab -> Page Elements .
  2. Click on Add a Gadget where you wish to place Search Box.
  3. Choose HTML/JavaScript from the List.
  4. Place any one Search Box code in to it and Save the Gadget.


Style 1

search box style1
<style type="text/css">
#w2b-searchbox{background:url(https://blogger.googleusercontent.com/img/b/R29vZ2xl/AVvXsEgEHh_kOjXlD-eTF86gg-p_6hcuexrsAV-iFbqDRbj-9aPg5mFUn8QmFPCOVpWekhpRaqWq6XnJs7Zk4Pff9xzUPmpho242nX9wGVEKKDBZOB1xjVU7ZuQ-5pfZ_2hyRgCmhfQwIJeAVGGa/) no-repeat scroll center center transparent;width:307px;height:50px;disaply:block;}
form#w2b-searchform{display: block;padding: 10px 12px;margin:0;}
form#w2b-searchform #s{padding: 6px;margin:0;width: 235px;font-size:14px;vertical-align: top;border:none;background:transparent;}
form#w2b-searchform #sbutton{margin:0;padding:0;height:30px;width:30px;vertical-align: top;border:none;background:transparent;}
</style>   
<div id="w2b-searchbox">
<form id="w2b-searchform" action="/search" method="get">
    <input type="text" id="s" name="q" value="Search..." onfocus='if (this.value == "Search...") {this.value = ""}' onblur='if (this.value == "") {this.value = "Search...";}'/>
    <input type="image" src="http://img1.blogblog.com/img/blank.gif" id="sbutton" />
</form>
</div>


Style 2

search box style2
<style type="text/css">
#w2b-searchbox{background:url(https://blogger.googleusercontent.com/img/b/R29vZ2xl/AVvXsEgykgrntraF9QqfSeVm3pVhDnin9X40I9z1g37MZuqcKtOHNuNiaEiAcS3OnLyT8c-R5AB9E34Bza-8Yuuex27G6salhs5PW7bnzztQ9Tj1mLDg6G-cpuHWiCEbZdaouHu348FgmonATzoq/) no-repeat scroll center center transparent;width:307px;height:50px;disaply:block;}
form#w2b-searchform{display: block;padding: 10px 12px;margin:0;}
form#w2b-searchform #s{padding: 6px;margin:0;width: 235px;font-size:14px;vertical-align: top;border:none;background:transparent;}
form#w2b-searchform #sbutton{margin:0;padding:0;height:30px;width:30px;vertical-align: top;border:none;background:transparent;}
</style>   
<div id="w2b-searchbox">
<form id="w2b-searchform" action="/search" method="get">
    <input type="text" id="s" name="q" value="Search..." onfocus='if (this.value == "Search...") {this.value = ""}' onblur='if (this.value == "") {this.value = "Search...";}'/>
    <input type="image" src="http://img1.blogblog.com/img/blank.gif" id="sbutton" />
</form>
</div>


Style 3

search box style3
<style type="text/css">
#w2b-searchbox{background:url(https://blogger.googleusercontent.com/img/b/R29vZ2xl/AVvXsEiHyX4OYKViwH3BIfTuSe9oE-BOmlRReujhgCf9oVqHpjo_bfjxV04IVPysB59dYpLbOwjoo65b86KFkE67CTdhLuFmf9LAsrz7WVW2o1tsRmmIrH0gB-aPKp0Wn31UFzh3ZZRNniWPIfhZ/) no-repeat scroll center center transparent;width:307px;height:50px;disaply:block;}
form#w2b-searchform{display: block;padding: 10px 12px;margin:0;}
form#w2b-searchform #s{padding: 6px;margin:0;width: 235px;font-size:14px;vertical-align: top;border:none;background:transparent;}
form#w2b-searchform #sbutton{margin:0;padding:0;height:30px;width:30px;vertical-align: top;border:none;background:transparent;}
</style>   
<div id="w2b-searchbox">
<form id="w2b-searchform" action="/search" method="get">
    <input type="text" id="s" name="q" value="Search..." onfocus='if (this.value == "Search...") {this.value = ""}' onblur='if (this.value == "") {this.value = "Search...";}'/>
    <input type="image" src="http://img1.blogblog.com/img/blank.gif" id="sbutton" />
</form>
</div>


Style 4

search box style4
<style type="text/css">
#w2b-searchbox{background:url(https://blogger.googleusercontent.com/img/b/R29vZ2xl/AVvXsEiv-Lj08enEwaG-TdTzzhSVHBs_rApkihUu5nZLOG3oBuYsSz1Q0n6InrkFkUg0ok9ptZYh10ynLU-r4uaTOH700fw77WnRrsdohVNC1WoHoEdXW8Ket8qR_-ETFXjEjIwllcz0uf42lQhg/) no-repeat scroll center center transparent;width:307px;height:50px;disaply:block;}
form#w2b-searchform{display: block;padding: 12px;margin:0;}
form#w2b-searchform #s{padding: 6px 6px 6px 26px;margin:0;width: 215px;font-size:14px;vertical-align: top;border:none;background:transparent;}
form#w2b-searchform #sbutton{margin:0;padding:0;height:30px;width:30px;vertical-align: top;border:none;background:transparent;}
</style>   
<div id="w2b-searchbox">
<form id="w2b-searchform" action="/search" method="get">
    <input type="text" id="s" name="q" value=""/>
    <input type="image" src="http://img1.blogblog.com/img/blank.gif" id="sbutton" />
</form>
</div>


Style 5

search box style5
<style type="text/css">
#w2b-searchbox{background:url(https://blogger.googleusercontent.com/img/b/R29vZ2xl/AVvXsEgL6IR1Wmk-ZrzPRiPqc1iaP7yxcmX_cmDnodSLO3Eu0dUez1idPXdRiNTPaEpkGSvWsY85lvE0Jvq7HI-ardcOkR18IRraAiz4r0Wk34sKenQYbyZlbXPycgW2BCWLfP-biJEOrh6W8fxp/) no-repeat scroll center center transparent;width:307px;height:50px;disaply:block;}
form#w2b-searchform{display: block;padding: 12px;margin:0;}
form#w2b-searchform #s{padding: 6px 6px 6px 26px;margin:0;width: 215px;font-size:14px;vertical-align: top;border:none;background:transparent;}
form#w2b-searchform #sbutton{margin:0;padding:0;height:30px;width:30px;vertical-align: top;border:none;background:transparent;}
</style>   
<div id="w2b-searchbox">
<form id="w2b-searchform" action="/search" method="get">
    <input type="text" id="s" name="q" value=""/>
    <input type="image" src="http://img1.blogblog.com/img/blank.gif" id="sbutton" />
</form>
</div>


Style 6

search box style6
 
<style type="text/css">
#w2b-searchbox{background:url(https://blogger.googleusercontent.com/img/b/R29vZ2xl/AVvXsEgshgL55iIdAFyIiOsAWOYkkTlRgYIcs0X81uBPJ_TWEHFNrEFQ7zy49-QByybPUoDs1CjrN2TIXBCxt-xQpDt2mr4ZsO0hhVrbObpCEN8_NiW3oUHHrTDGg8T6VtHbdexguz_rjlBlpkKU/) no-repeat scroll center center transparent;width:307px;height:50px;disaply:block;}
form#w2b-searchform{display: block;padding: 12px;margin:0;}
form#w2b-searchform #s{padding: 6px 6px 6px 26px;margin:0;width: 215px;font-size:14px;vertical-align: top;border:none;background:transparent;}
form#w2b-searchform #sbutton{margin:0;padding:0;height:30px;width:30px;vertical-align: top;border:none;background:transparent;}
</style>   
<div id="w2b-searchbox">
<form id="w2b-searchform" action="/search" method="get">
    <input type="text" id="s" name="q" value=""/>
    <input type="image" src="http://img1.blogblog.com/img/blank.gif" id="sbutton" />
</form>
</div>

Christmas Countdown Widget for Blogger

0

Christmas Countdown Widget for Blogger


Christmas is pretty near and we have already started our count down. This widget does what the name suggests. It will display the number of days, hours minutes and second left till Christmas. When it reaches the target date, it will display a Greeting Message

Demo

You can see a demo of this Widget on my Sidebar. If you need a bigger demo, here it is:
Wish you all a very Happy Christmas!

How to Add the Widget

If you use Blogger, then you can use this Button to install the Widget in one Click.

If you want the code to use it elsewhere, then here it is :

<div id="bp_count_down_div"></div>
<script language="JavaScript">
var bp_date_target = new Date("December 25, 2011 00:00:00");
var bp_date_now = new Date();
var bp_count_down_complete_message = "Wish you all a very Happy Christmas";
if (bp_date_now >= bp_date_target) {
 document.getElementById("bp_count_down_div").innerHTML = bp_count_down_complete_message;
} else {
 bp_time_difference = Math.floor(((bp_date_target - bp_date_now).valueOf()) / 1000);
 display_time_difference(bp_time_difference);
}
function display_time_difference(bp_time_difference) {
 if (bp_time_difference <= 0) {
 document.getElementById("bp_count_down_div").innerHTML = bp_count_down_complete_message;
 return;
 }
 bp_count_down_message = bp_format_seconds(bp_time_difference, 86400, 100000) + " Days " + bp_format_seconds(bp_time_difference, 3600, 24) + " Hours " + bp_format_seconds(bp_time_difference, 60, 60) + " Minutes " + bp_format_seconds(bp_time_difference, 1, 60) + " Seconds for Christmas";
 document.getElementById("bp_count_down_div").innerHTML = bp_count_down_message;
 setTimeout("display_time_difference(" + (bp_time_difference - 1) + ")", 1000);
}
function bp_format_seconds(secs, num1, num2) {
 num = ((Math.floor(secs / num1)) % num2).toString();
 if (num.length < 2) s = "0" + num;
 return "" + num + "";
}
</script>


The widget makes use of some simple JavaScript methods which displays the count down based on the User’s System Time. You can customize the Widget by Editing the Widget Content. If you liked the count down, do share it with your friends and please let us know if you have any suggestions for improving the widget.

How To Add Stylish Border Around Selected Widget Of Blogger?

0

How To Add Stylish Border Around Selected Widget Of Blogger?

How To Add Stylish Border Around Selected Widget Of Blogger?
Today the question is that "How To Make Your Blog Widgets/Gadgets Stylish And Awesome Through Adding Extra CSS Borders Around Your Desired Widgets/Gadgets?"

Some time your template is so simple that it can not attract visitors, so you have to spices up your blog,     but after that time your blog gonna heavy day by day and visitors also dislike this. So now here is the middle way to design simple and stylish with easy and short coding.

If you want to add borders you can also use this code, There are many different type of codes given below. For All Of These Code, You Have To Do Some Thing Like This.

Features:
1.) It Will Change Your Desired Widget Background Only Not All.
2.) Simple Steps Wioth Easy Installation.
3.) Quick To Load And Awesome In Look.
4.) Pure CSS Code.
5.) 6 Different Style Is Provided Below.
6.) Fully Customizable.


How To Add In Blogspot?
1.) Go To Your www.blogger.com
2.) Open Your Desire Blog.
3.) Go To Layout.
4.) First Find That Widget ID On Which You Want To Style Up...(If You Don't Know How To Get Widget ID Just Comment Below, I Will Explain You Easily)
5.) Now Go To "Template"
6.) Click "Edit HTML" Button To Edit It.
7.) Now Press "CTRL+F" And Find ]]></b:skin>
8.) Copy The Below Code And Paste It Just Before It.


For Simple Square Color Border:-

#YourWidgetID {
padding: 5px;
border: 1px solid #ff0000;
//*Your Extra CSS Here*//
}
For Simple Square Color Border With Filled Background:-

#YourWidgetID {
padding: 5px;
border: 1px solid #ff0000;
background:#ffffff;
//*Your Extra CSS Here*//
}

For Simple Square Color Border With Filled Background And Shade:-

#YourWidgetID {
padding: 5px;
border: 1px solid #ff0000;
background:#ffffff;
box-shadow: 3px 3px 3px #ff0000;
//*Your Extra CSS Here*//
}

For Simple Rounded Color Border:-
#YourWidgetID {
padding: 5px;
border: 1px solid #ff0000; -moz-border-radius:6px; -webkit-border-radius:6px;
//*Your Extra CSS Here*//
}

For Simple Rounded Color Border With Filled Background:-
Read More

How To Embed "SWF,FLV" Files Into Your Blog And Website

0

How To Embed "SWF,FLV" Files Into Your Blog And Website

Nowadays flash files are widely used in web and blog developing and designing, they not only give a gorgeous look to them but also provide a handy user interference.
Embedding a flash file in HTML pages is as easy as 123. All you need is a flash file uploaded at FTP (File Transfer Protocol) server. The best and free way for uploading flash file is to upload them on Google Sites.
  1. Make a site on sites.google.com
  2. Change page template to file cabinet.
  3. Add .swf file.
  4. Right-click and copy the download url of .swf file.
  5. Type this code in your site or blog.
  6. Replace the green code with the url of .swf file.
  7. Save and enjoy.
Code

<embed src="https://sites.google.com/site/exeideashassan/exe-ideas-hare-drive/EXEIdeasUnderConstruction.swf?attredirects=0" quality="high" allowscriptaccess="always" type="application/x-shockwave-flash" pluginspage="http://www.macromedia.com/go/getflashplayer" align="middle" height="600px" width="800px"></embed>

Change quality, align, height and width attributes to your need and mood.
Feel free to ask any queries.

How To Add POP UP Facebook Like Box For Blog & Website?

0

How To Add POP UP Facebook Like Box For Blog & Website?

How To Add POP UP Facebook Like Box For Blog & Website?

This widget pops up a jQuery window containing Facebook likebox as soon as a new visitor arrives. This plugin can be added to both Blogger Blogs and Wordpress. I am using here the same jQuery effect like this one can be widely seen on many blogs now. It will help you increase your Facebook Fans greatly.
This popup appears only once to every new visitor. The ip address of the visitor is stored in browser cookie and as the page loads again the widget wont be called again for the same visitor thus eliminating the chances of bugging regular readers. Because of course it will look weird if the popup appears again and again on every pageview.
It will appear both on homepage and sub pages depending which page the visitor is accessing. I have set the cookie refresh time to 30 days, which means that this lightbox will appear again for the same visitor after 30 days. We can easily set the number of days to prompt the visitors about your Facebook Fan page. Lets get straight to the one step installation process.
Get the more fans to your fanpage blogger by adding a popup facebook like box to your blogspot.By adding this customized widget may know the visitors to know the number of people like your website and join your site directly.To get this widget follow below procedure:-


Features:
1.) Un-Blockable POP-UP By All Browsers.
2.) POP-UP With LightBox Effect.
3.) Close Button Also Included.
4.) Quick To Load And Easy To Install.
5.) Simple And Stylish Design.


How To Add In Blogspot?
1.) Go To Your www.blogger.com
2.) Open Your Desire Blog.
3.) Go To Layout.
4.) Click "Add A Gadget" Where You Want To Add It.
5.) Now Scroll To "HTML-JAVASCRIPT"
6.) Click "+" Icon To Add It.
7.) Now Copy The Below Code And Paste It To There.
8.) Leave The Title Empty.
9.) Click Save, Now You Are Done.


How To Add In Website?
1.) Just Go To Your HTML File.
2.) Now Copy The Below Code And Paste It Between <body> </body>.
3.) Save It, Now You Are Done.


<script src='https://ajax.googleapis.com/ajax/libs/jquery/1.6.1/jquery.min.js'></script>
<script src="http://exeideasinternational.googlecode.com/files/jquery.colorbox-min.js"></script>
<script type="text/javascript">
jQuery(document).ready(function(){
if (document.cookie.indexOf('visited=true') == -1)
{
var fifteenDays = 1000*60*60*24*30;
var expires = new Date((new Date()).valueOf() + fifteenDays);
document.cookie = "visited=true;expires=" + expires.toUTCString();
$.colorbox({width:"400px", inline:true, href:"#exestylepopups"});
}
});
</script>
<style type="text/css">
/*
ColorBox v1.3.16
(Copyright (c) 2011 Jack Moore - jack@colorpowered.com)
*/
#colorbox,#cboxOverlay,#cboxWrapper{position:absolute;top:0;left:0;z-index:9999;overflow:hidden}#cboxOverlay{position:fixed;width:100%;height:100%}#cboxMiddleLeft,#cboxBottomLeft{clear:left}#cboxContent{position:relative}#cboxLoadedContent{overflow:auto}#cboxTitle{margin:0}#cboxLoadingOverlay,#cboxLoadingGraphic{position:absolute;top:0;left:0;width:100%}#cboxPrevious,#cboxNext,#cboxClose,#cboxSlideshow{cursor:pointer}.cboxPhoto{float:left;margin:auto;border:0;display:block}.cboxIframe{width:100%;height:100%;display:block;border:0}#cboxOverlay{background:#000;opacity:0.5 !important}#colorbox{box-shadow:0 0 15px rgba(0,0,0,0.4);-moz-box-shadow:0 0 15px rgba(0,0,0,0.4);-webkit-box-shadow:0 0 15px rgba(0,0,0,0.4)}#cboxTopLeft{width:14px;height:14px;background:url(https://blogger.googleusercontent.com/img/b/R29vZ2xl/AVvXsEhmkSgbm6m453n0q9CAkQ5XdCe0pBhUBq8d87uUqCVJDjoTmIvEGaHwwvXt9yxKqjiNm4J9_Rk9WUktxalFyLJ_dUl20ltzTG0Jiohfmk81rIa8QfoUabVr-0uzVlpj2xvAGYW94vC3hTk/s1600/controls.png) no-repeat 0 0}#cboxTopCenter{height:14px;background:url(https://blogger.googleusercontent.com/img/b/R29vZ2xl/AVvXsEji9GI03O0EqC1TRhl0HyXmft94Nm4VcGx3zqvbnsm9PJy76uzLAAoGZO04mcleFir6DWzVD4mnDKd4793S8OTm0-X7TTxz_lsdPXp0JF8GDoO2lec4k10p3PQWX6eLQfjZqGPFnAl9DHU/s400/border.png) repeat-x top left}#cboxTopRight{width:14px;height:14px;background:url(https://blogger.googleusercontent.com/img/b/R29vZ2xl/AVvXsEhmkSgbm6m453n0q9CAkQ5XdCe0pBhUBq8d87uUqCVJDjoTmIvEGaHwwvXt9yxKqjiNm4J9_Rk9WUktxalFyLJ_dUl20ltzTG0Jiohfmk81rIa8QfoUabVr-0uzVlpj2xvAGYW94vC3hTk/s1600/controls.png) no-repeat -36px 0}#cboxBottomLeft{width:14px;height:43px;background:url(https://blogger.googleusercontent.com/img/b/R29vZ2xl/AVvXsEhmkSgbm6m453n0q9CAkQ5XdCe0pBhUBq8d87uUqCVJDjoTmIvEGaHwwvXt9yxKqjiNm4J9_Rk9WUktxalFyLJ_dUl20ltzTG0Jiohfmk81rIa8QfoUabVr-0uzVlpj2xvAGYW94vC3hTk/s1600/controls.png) no-repeat 0 -32px}#cboxBottomCenter{height:43px;background:url(https://blogger.googleusercontent.com/img/b/R29vZ2xl/AVvXsEji9GI03O0EqC1TRhl0HyXmft94Nm4VcGx3zqvbnsm9PJy76uzLAAoGZO04mcleFir6DWzVD4mnDKd4793S8OTm0-X7TTxz_lsdPXp0JF8GDoO2lec4k10p3PQWX6eLQfjZqGPFnAl9DHU/s400/border.png) repeat-x bottom left}#cboxBottomRight{width:14px;height:43px;background:url(https://blogger.googleusercontent.com/img/b/R29vZ2xl/AVvXsEhmkSgbm6m453n0q9CAkQ5XdCe0pBhUBq8d87uUqCVJDjoTmIvEGaHwwvXt9yxKqjiNm4J9_Rk9WUktxalFyLJ_dUl20ltzTG0Jiohfmk81rIa8QfoUabVr-0uzVlpj2xvAGYW94vC3hTk/s1600/controls.png) no-repeat -36px -32px}#cboxMiddleLeft{width:14px;background:url(https://blogger.googleusercontent.com/img/b/R29vZ2xl/AVvXsEhmkSgbm6m453n0q9CAkQ5XdCe0pBhUBq8d87uUqCVJDjoTmIvEGaHwwvXt9yxKqjiNm4J9_Rk9WUktxalFyLJ_dUl20ltzTG0Jiohfmk81rIa8QfoUabVr-0uzVlpj2xvAGYW94vC3hTk/s1600/controls.png) repeat-y -175px 0}#cboxMiddleRight{width:14px;background:url(https://blogger.googleusercontent.com/img/b/R29vZ2xl/AVvXsEhmkSgbm6m453n0q9CAkQ5XdCe0pBhUBq8d87uUqCVJDjoTmIvEGaHwwvXt9yxKqjiNm4J9_Rk9WUktxalFyLJ_dUl20ltzTG0Jiohfmk81rIa8QfoUabVr-0uzVlpj2xvAGYW94vC3hTk/s1600/controls.png) repeat-y -211px 0}#cboxContent{background:#fff;overflow:visible}#cboxLoadedContent{margin-bottom:5px}#cboxLoadingOverlay{background:url(https://blogger.googleusercontent.com/img/b/R29vZ2xl/AVvXsEidEG1OyQsbJKM_2NmW5jtxE1xmY9gZM2_gYcBvsusXNi_8NTgUcLtzlHHhYDpN0xHU3yKI5YBBZZJSx7CedCnQ00p1MVOPScW21TbhaCcKFn4gQdY8YJdoiKaZYuXLf8ivkwiAdiwpY1c/s400/loadingbackground.png) no-repeat center center}#cboxLoadingGraphic{https://blogger.googleusercontent.com/img/b/R29vZ2xl/AVvXsEjKCPSyt2mUAVVGOAtAj5aMCLs9sgmCfzNxHAZC67UrAzHdDScnFK7PP7IH1YG0bGdObSkvizzSUIJaXMM-ccDMTm-e8y0Mky3kSuaDxhxVLV3DBeJmKKqfaWnGeEbXR3kj41spl0uIgFY/s400/loading.gif) no-repeat center center}#cboxTitle{position:absolute;bottom:-25px;left:0;text-align:center;width:100%;font-weight:bold;color:#7C7C7C}#cboxCurrent{position:absolute;bottom:-25px;left:58px;font-weight:bold;color:#7C7C7C}#cboxPrevious,#cboxNext,#cboxClose,#cboxSlideshow{position:absolute;bottom:-29px;background:url(https://blogger.googleusercontent.com/img/b/R29vZ2xl/AVvXsEhmkSgbm6m453n0q9CAkQ5XdCe0pBhUBq8d87uUqCVJDjoTmIvEGaHwwvXt9yxKqjiNm4J9_Rk9WUktxalFyLJ_dUl20ltzTG0Jiohfmk81rIa8QfoUabVr-0uzVlpj2xvAGYW94vC3hTk/s1600/controls.png) no-repeat 0px 0px;width:23px;height:23px;text-indent:-9999px}#cboxPrevious{left:0px;background-position:-51px -25px}#cboxPrevious.hover{background-position:-51px 0px}#cboxNext{left:27px;background-position:-75px -25px}#cboxNext.hover{background-position:-75px 0px}#cboxClose{right:0;background-position:-100px -25px}#cboxClose.hover{background-position:-100px 0px}.cboxSlideshow_on #cboxSlideshow{background-position:-125px 0px;right:27px}.cboxSlideshow_on #cboxSlideshow.hover{background-position:-150px 0px}.cboxSlideshow_off #cboxSlideshow{background-position:-150px -25px;right:27px}.cboxSlideshow_off #cboxSlideshow.hover{background-position:-125px 0px}#mdfb{font:12px/1.2 Arial,Helvetica,san-serif;color:#666}#mdfb a,#mdfb a:hover,#mdfb a:visited{text-decoration:none}.mdbox-title{background:#000;color:#fff;font-size:20px !important;font-weight:bold;margin:10px 0;border:20px solid #ddd;-moz-border-radius:6px;-webkit-border-radius:6px;border-radius:6px;box-shadow:5px 5px 5px #CCC;padding:10px;line-height:25px;font-family:arial !important}
</style>
<div style='display:none'>
<div id='exestylepopups' style='padding:10px; background:#fff;'>
<center><h3 class="mdbox-title">Receive all updates via Facebook. Just Click the Like Button Below...</h3></center><center>
<iframe src="//www.facebook.com/plugins/likebox.php?href=http%3A%2F%2Fwww.facebook.com%2FEXEIdeas2010&amp;width=300&amp;colorscheme=light&amp;show_faces=true&amp;border_color=%23ffffff&amp;stream=false&amp;header=false&amp;height=258" scrolling="no" frameborder="0" style="border:none; overflow:hidden; width:300px; height:258px;" allowtransparency="true"></iframe>
</center><p style=" float:right; margin-right:35px; font-size:9px;" >Powered By <a style=" font-size:9px; color:#3B78CD; text-decoration:none;" href="http://www.exeideas.com">EXEIdeas</a></p>
</div></div>

Read More